We can characterize lathe workholding solutions according to their Precision, Repeatability, and Convenience. This Guide will help you choose the best workholding solution for your lathe or turning application.
The following
table provides a quick comparison of the strengths and weaknesses of the different means of holding
the workpiece on a lathe:
Method
Precision
Repeatability
Convenience
Notes
Collets
High
High
High
Fast, high precision, high repeatability, grips well,
unlikely to mar workpiece, grip spread over a wide area. Expensive
chucks and collets. Handles limited lengths. Workpiece must be round
and must fit nearly exactly to the collet size.
3-Jaw Chuck With Soft Jaws
High
High
High
For larger workpieces, 3 jaw chucks with softjaws are the norm in the CNC world.
3-Jaw Self-Centering Chuck with Hard Jaws
Low
Low
High
Common, cheap, simple. Low precision, low repeatability
if you remove the workpiece and have to put it back.
4-Jaw Chuck
High
High
Medium
Can be time consuming to individually adjust the jaws,
but will result in high precision. Can hold pieces offset for turning
cams or eccentrics. Can hold irregular shapes and square or rectangular
stock.
6-Jaw Self-Centering Chuck
Medium
Medium
High
Best for thin wall work or to grip finished edges of
workpiece. Obviously good for hex stock.
Faceplate Turning
Varies w/ Setup
Medium
Low
Great for irregular shapes. Involves clamps like a milling
setup. May need counterweights to keep things balanced.
Turning Between Centers
High
High
Low
Great precision, allows part to be put back between
centers with very high repeatability.
Constant Face Turning
High
High
High
The modern alternative to turning between centers. Instead
of using lathe dogs, which are kind of a nuisance to set up, the constant
face system uses hydraulic or other force to grip and drive the spindle
end. You can now buy these systems relatively cheaply on eBay (see
seller 800Watt who sold me mine).
Expanding Mandrels
High
High
Medium
These work from the inside out rather than the outside
in but are otherwise much like collets. They're ideal for thin walled parts that need the support, or also for holding parts where you need access to the whole outside surface and have no place to clamp other than an ID bore.
Method
describes the particular technique or tooling to be used.
Precision
describes how precisely the workpiece will be held, or how close to concentrically
it will run with the spindle before taking any cuts.
Repeatability
describes how easy it is to take the workpiece out and then get it back
in precisely again.
Convenience describes whether the solution is a time-saver versus other solutions with similar advantages.
Notes
provides narrative summary of the method's strengths, weaknesses, and
uses.
Below we will
consider each method in more detail. You should be able to choose an appropriate
method pretty well from this table based on your needs. For example, if
you can carry out all the operations on the part with removing it from
the lathe, repeatability should not be an important factor.
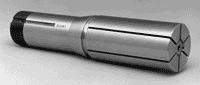
Collets: High Precision, High Repeatability, High Convenience
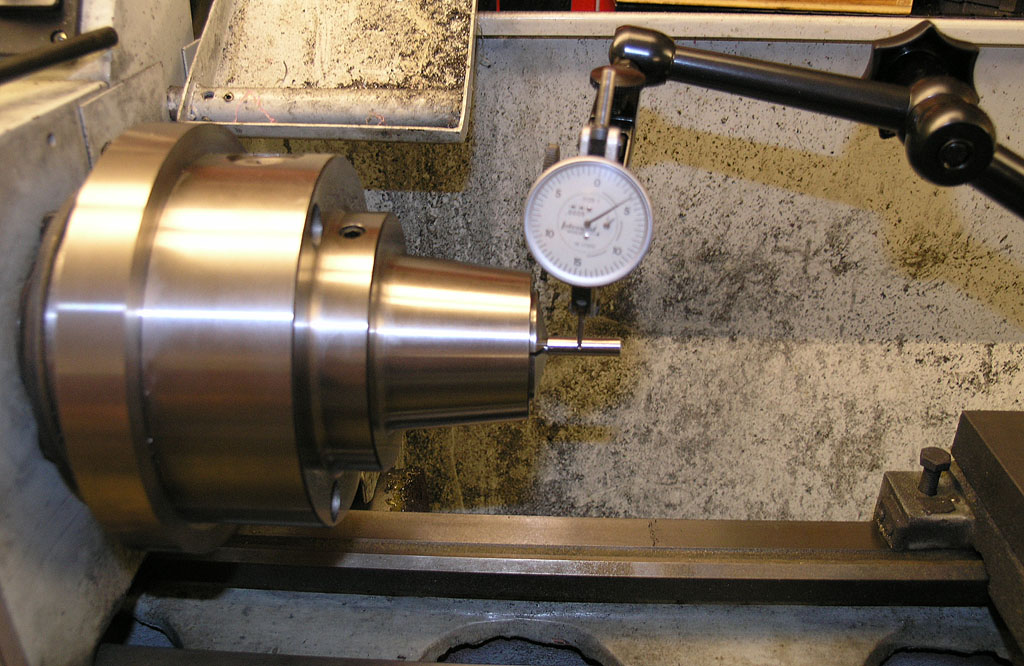
Checking runout on a 5C Collet Chuck. That's an Interapid 10ths indicator, so we're seeing not quite 0.0004"...
Hardinge built a mighty lathe empire on machines that used collets very well, and we've got straight A's on our precision, repeatablity, and convenience report
card, so how can we lose? There are basically three disadvantages to collets.
First, is capacity. You can only use a 5C collet up to perhaps a 1"
diameter workpiece capacity and the collet will only take a similar length
inside the collet. By definition this limits us to small parts. Of course there are larger collet systems, such as 16C. But by comparison to the size lathe you generally see a 16C collet on, this still begs the question of how to hold even larger workpieces. It's generally accepted that collets are best for parts 3" or less in diameter.
There are various ways to escape this limitation:
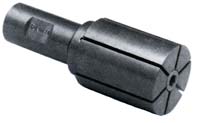
- Expanding collets act like mandrels. They expand inside a hole on the workpiece rather than gripping the OD of a workpiece.
- Step Collets and Pot Chucks) have to be machined for each diameter but can hold larger workpieces. They're also useful for holding workpieces off center.
Second,
you will need a collet that fits the workpiece with an accuracy of 1/64",
at least for the very popular 5C collet system. The ER system tolerates
more error, but is less amenable to automatic operation.
Lastly, collets
are expensive. You will need an expensive collet chuck and an even more
expensive collet set. Given how closely the collets have to fit the workpiece,
you will need a lot of them if you expect to cover a wide range of sizes. In addition, collets are a consumable--they will wear out and need to be replaced.
Still, if you want the most
efficient and precise machining of small parts, collets are often the way to
go. Here are their advantages versus jawed chucks with soft jaws.
Higher Spindle Speeds and Less Vibration
The total mass of a collet workholding system is often
less than conventional chucks allowing you to run higher spindle speeds
with less vibration. The spindle can also accelerate to speed faster since it is spinning less mass.
Since the collet will also grip with more force spread
over a greater area, it is less likely to mar a workpiece than many other
methods. A collet is also less likely to distort a thin-walled part.
Advantages in Setup Time
For very large and very small lot sizes, collets have an advantage. Swapping jaws takes around 15-20 minutes for a standard jawed chuck. There are chucks especially designed for quick changes that can do it in 1 minute, but a quick change collet chuck allows the collet to be changed in 15-20 seconds.
With large lot sizes, consider that a collet chuck takes less time to open or close than a jaw chuck, which will reduce the non-cutting time on a cycle. That adds up for very large lot sizes.
We can summarize a lot of this by generalizing that collet chucks trade flexibility for speed. If part size is consistent and the parts are small enough, the collet chuck is faster. But if you have a lot of variation in workpiece size, the jawed chucks are likely faster.
Another consideration is type of material. Hot rolled steel, castings, forgings, and extrusions have more diameter variations in the raw stock. These materials can be better suited to jawed chucks. Cold rolled material is much more consistent on size.
Because of all this, collets are the default workholding for smaller CNC lathes and many precision toolroom lathes such as the Hardinge. Larger lathes typically use 3 Jaw Chucks with Soft Jaws to gain many of the same advantages.
There are a variety of ways to get started with collets. One of the simplest is to purchase a collet chuck. Slightly more involved is to use a nosepiece and drawbar setup. With a lever operated collet closer, you can quickly pop parts in and out of the collet, which is a tremendous productivity increase when making runs of identical parts.
The logical conclusion to all this is a pneumatic or hydraulic collet closer and bar feeder or bar puller. In CNC applications, you
can set up the collet so bar is fed in, machined, and parted off as a
continuous operation.
If the principle shortcoming of collets is workpiece size, the most common answer to that for larger CNC lathes is to use a 3-Jaw Chuck with Soft Jaws
Soft Jaws have a couple of large advantages over hard jaws.
First, they align the workpiece to the centerline precisely. The problem with hardjaws in a 3 jaw chuck is the chuck scroll does not perfectly align the workpiece on the centerline at different diameters. Softjaws are precisely bored at the diameter they'll be used at so they're accurate and repeatable.
Second, they can provide a backstop that precisely aligns the rear of the workpiece as well.
Their main disadvantage is a new set of jaws has to be made for each workpiece size, but that's not very hard to do.
Here is a two-part video series from Haas that talks about how to make and use Soft Jaws:
Part 1: Fundamentals and OD Gripping
Part 2: ID Gripping, Recutting, and More
3-Jaw
Self-Centering Chuck: Low Precision, Low Repeatability, High Convenience
If your mission is to chuck
up a cylindrical piece of material and get started making chips quickly,
the 3-jaw chuck is your tool of choice. They are possibly the lowest precision
option for holding your workpiece because there are many ways for them
to be off in terms of concentricity with the axis of spindle rotation.
Any little chip or dust between the jaws and workpiece or in the scroll
mechanism will throw one off. Because they are so easy to use, they often
have a lot of wear.
Once you turn a workpiece
in the chuck, the physics of turning will ensure that your workpiece is
now concentric with the spindle. Unfortunately, if you take it out of
the chuck, the low precision means you are right back to an imprecise
situation. Always try to finish all the operations, both rough and finishing
in one setup when using a 3-jaw chuck! Conversely,
if you can finish a piece entirely in one setup of the 3-jaw chuck, it
is probably the absolute best choice because it will let you get started
the fastest.
Harvey (Machine Shop Trade
Secrets) says there is no point in using one unless it can be adjusted
for concentricity. Such chucks (often called "Set-Tru") cost more, but the feature adds a lot of flexibility.
Note that the 3-jaw chuck,
having the fewest jaws of the chuck types (thank you Albert Einstein!),
will therefore apply the most pressure to the workpiece yet with the least
surface area. More jaws will spread the pressure more evenly. This can
result in marring of the surface, so a 3-jaw is not ideal for gripping
a finished part in the jaws. They're also problematic for machining thin-walled parts because they apply too much pressure and distort the walls.
4-Jaw
Chuck: High Precision, High Repeatability, Medium Convenience
Next up in popularity is
the 4-jaw chuck. Many lathes include one. This is your weapon of choice
if you have to take a workpiece and start out with it being as close to
concentric as possible right after you put it in the chuck before taking
any cuts. It's ability to do this speaks to the repeatability of the chuck
should you need to remove a part and then put it back. The fly in this
ointment is convenience gets sacrificed. Each time you put a part into
the chuck you need to center it by adjusting the jaws and using a dial
indicator or wobbler.
4-jaw chucks grip the workpiece
more tightly than a 3-jaw, which may yield benefits in rigidity, especially
for small parts. They also allow a part to be turned eccentrically (i.e.
off center), which is essential for making cams and similar kinds of parts. The other great
use for a 4-jaw is holding non-cylindrical pieces that have to be turned.
Since the jaws are individually adjustable, you can make them fit a piece
well. I have seen an amazing amount of work get done on non-cylindrical
pieces using a 4-jaw from machinist's who don't have access to a mill.
I also use mine if I started
with the 3-jaw and have to put the piece back in for futher machining.
You won't get the 3-jaw lined up properly again, but the 4-jaw is made
for realignment.
Many of the old hands feel
a beginner should force himself to work exclusively with the 4-jaw until
it becomes second nature, and there is much to be said for that. The act
of indicating in a 4-jaw is something that ought to be second nature to
a machinist, and it resembles many other measurements you will have to
make, particularly if you have a mill.
Indicating in a 4-Jaw
Chuck so the Work is Centered:
1. After rough aligning to the chuck rings, using a dial
indicator on the work-piece, rotate the spindle through one complete revolution
noting the highest and lowest indicator readings;
2. Continue rotating the spindle and halt at exactly Midway between the
above two readings, then zero the indicator bezel to the needle;
3. Rotate the spindle to bring jaw #1 ‘on plunger’ and adjust
jaws #1 and #3 to re-zero the indicator; finally
4. Rotate the spindle 90 degrees and adjust jaws #2 and #4 to zero the
indicator once again.
This is one of those things where I read it, it made total
sense, it was elegant, and it made me feel stupid for not having thought
of it myself. Here is a nice video by David Lemereis showing how to perform
this technique:
Fastest way to indicate a 4-jaw...
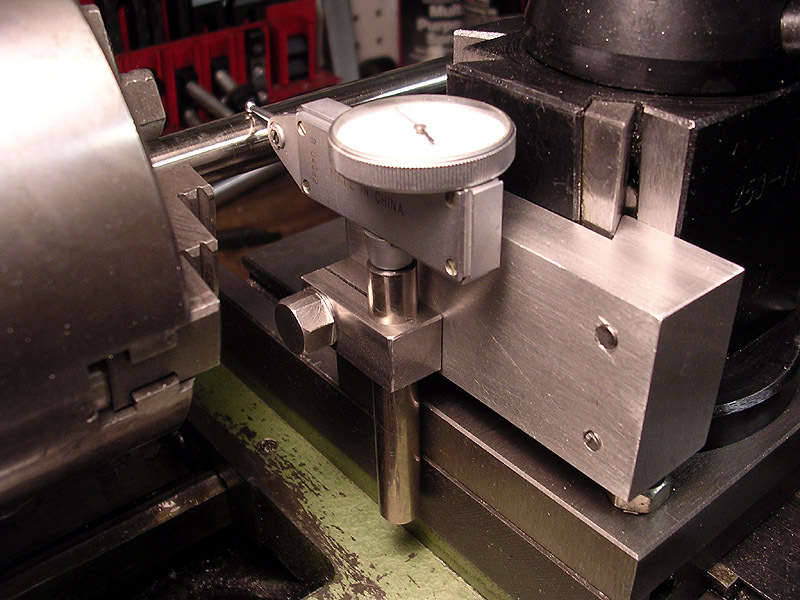
QCTP Indicator Holders
You can slap a magnetic indicator holder down on the cross
slide, most people do, but having a QCTP indicator holder seems like such
a wonderful luxury. Meanwhile, here is a photo to show you what I mean:
A QCTP Indicator Holder...
Indicating Square or Hex Stock
Indicating in square or hex stock? Try my height
gage method.
I use a bubble level to get the face level,
then I drop my height gage onto the cross slide platform (mine is flat)
and measure the height of the face. This is compared to the height of
the opposite face. It really helps to know how far the jaws move in one
revolution. On my 4-jaw, it's 0.140" per turn. Once you know how
far off you are numerically and how much a turn gives you, the process
goes much faster. As you can see, I got it lined up within a thousandth.
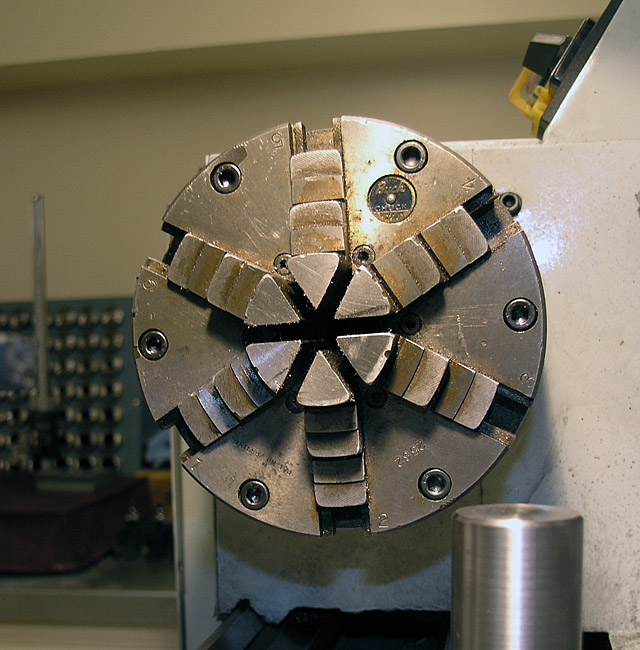
6-Jaw
Self-Centering Chuck: Medium Precision, Medium Repeatability, High
Convenience
I personally love the wonderfully
complex look of a 6-jaw chuck. Their true forte is in holding thin walled
tubing or finished parts without marring or collapsing the walls. Aside
from their ability to grip with more surface area, and to spread the gripping
force more evenly, they're pretty similar to 3-Jaw Chucks.
Given the 6-Jaw
advantage, and the tendency to reserve them only for finished workpieces
or thin wall tubing, they achieve somewhat higher precision and repeatability
than a 3-jaw with the same high convenience. Their biggest disadvantage
is that they are more costly.
I love my 6-jaw chuck!
Some of the
machinists I most respect swear by the 6-jaw chuck. Swede, the master
machinist behind the popular 5Bears site
says it is his favorite chuck. If you are a fan of Harvey's
book, Machine Shop Trade Secrets, you will note there are very
few pictures there of 3-jaw chucks. Most are 6-jaw or 4-jaw models.
Faceplate
Turning: Variable Precision, Medium Repeatability, Low Convenience
Think of the faceplate as
a milling machine where we spin the work instead of the cutting tool.
We can bore a large hole in a piece of rectangular stock, for example.
We need to take care to set up the work accurately and clamp it firmly
using techniques very much like that off a mill. An additional complication
is that you may need to also clamp a counterweight to the faceplate if
the piece is off center in shape or mass to keep the vibration down.
This is all a lot of trouble,
hence the low convenience rating. If you have a mill, you are probably
going to use it to do these operations rather than futzing with a faceplate.
The other use for the faceplate
is when turning between centers. The spindle engages the workpiece by
means of a lathe dog which tracks in a groove on the faceplate.
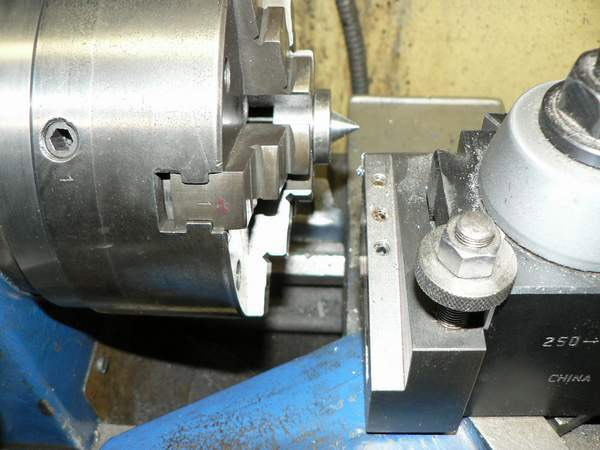
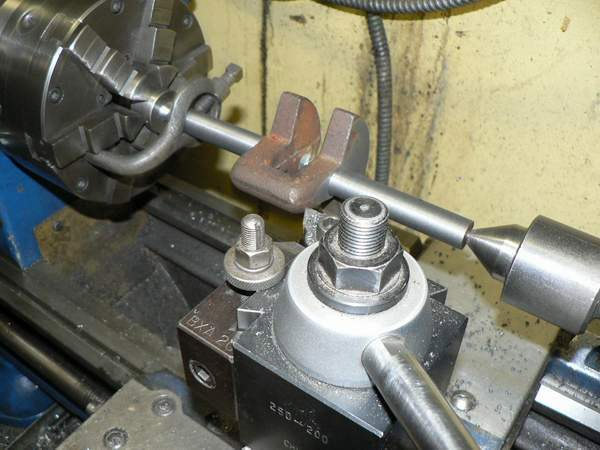
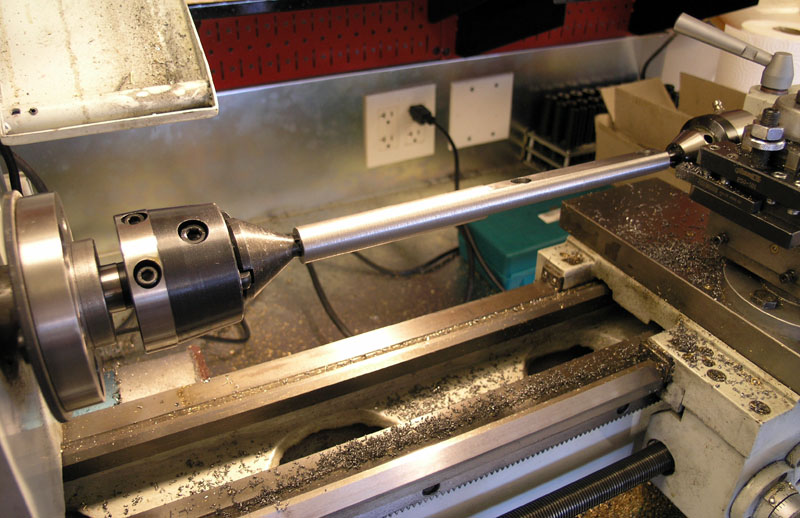
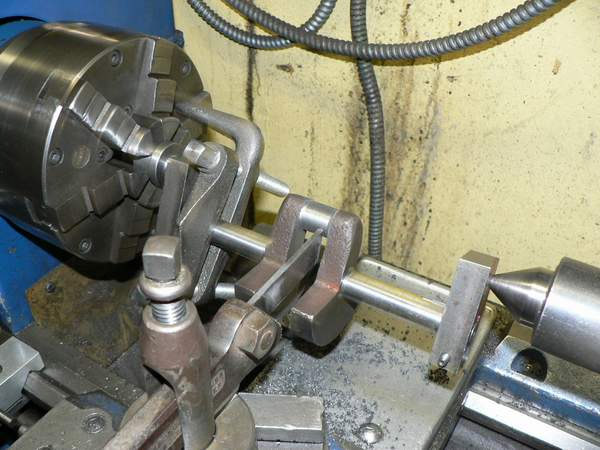
Turning
Between Centers: High Precision, High Repeatability, Low Convenience
Turning a piece between
centers means you have to drill the holes the centers run in, hence there
is setup overhead resulting in low convenience. However, if want a part
to be well supported and hence rigid, and if you will need to take that
part on and off the lathe more than once so needing repeatability, turning
between centers is a great approach to take.
Chuck center button for turning between centers...
And away we go...
Tip:
If you don't own or want to deal with a faceplate and center at the spindle
end, turn a "center" by chucking up some round stock in the
3-jaw or 6-jaw and tapering it to a point. Try for about a 60 degree taper.
As long as you leave the center in the chuck, it will be perfectly aligned
to the spindle. You can even put a lathe dog on the workpiece and let
the chuck jaws drive it. If you have a 4-jaw or Set-Tru chuck, you can
even make this new center a permanent fixture in your tooling because
you'll be able to dial it in with the 4-jaw so it is properly centered
again.
Tip: No lathe dogs?
I've seen guys use geared hose clamps (like on your car's radiator hoses)
to good effect for this purpose. They will not deal with incredible amounts
of force, so go easy!
Constant
Face Turning: High Precision, High Repeatability, High Convenience
The modern alternative to
turning between centers. Instead of using lathe dogs, which are kind of
a nuisance to set up, the constant face system uses hydraulic or other
force to grip and drive the spindle end. You can now buy these systems
relatively cheaply on eBay (see seller 800Watt who sold me mine). More
on this when I get a chance to experiment with the rig I purchased. Meanwhile,
if you are curious, do a little Google footwork. I found these interesting
links:
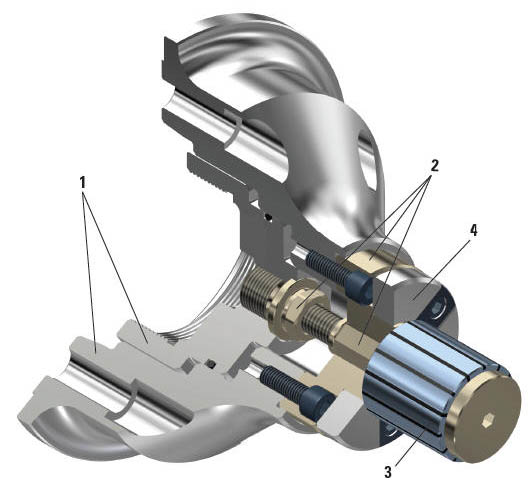
Expanding
Mandrels: High Precision, High Repeatability, Medium Convenience
Expanding Mandrels are ideal for:
- Holding thin-walled parts that would be distorted when too much pressure is applied by an outside clamping force.
- Holding parts whose outside surfaces must be machined in a single operation.
- Holding parts that have many different outside diameters and features that would be otherwise be difficult to clamp from the outside.
They are limited in the amount of cutting force that can be applied without spinning the part on the mandrel.
Expanding Mandrels grip the part by expanding against the walls of an inside bore.
They typically work by tightening a screw in their center that causes the leaves of the mandrell to expand and grip the ID bore of the part. It's possible to machine a profile on a mandrel to fit a part with complex internal geometry. It's also common to see them with shoulders to locate the end of the part and other similar features.
Mandrels don't have a huge range of motion, so it is common to machine them for a particular part's needs.
Royal even offers a power operated mandrel setup if you need to automate a lot of turning operations with mandrels on a CNC lathe:
A power operated mandrel like this can be a good choice for a sub-spindle on a CNC lathe because they grip without any possibility of damage to the outside surface and provide complete access to finish that surface in one operation.
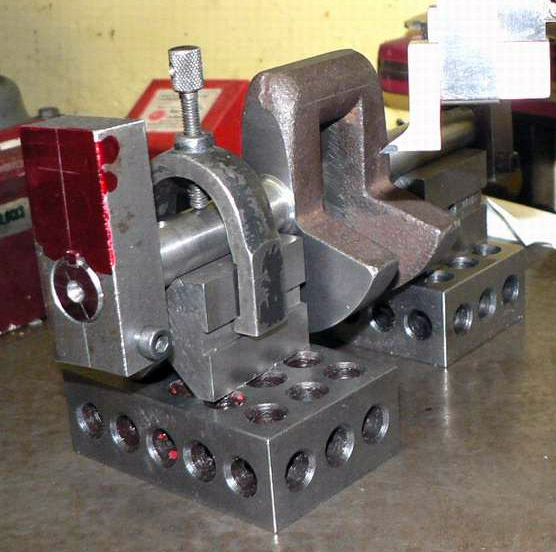
Unique
Setups: Offset Turning or Eccentric Turning
If you are going to build
model engines or do repair work on odd-shapes, you'll need to get used to offset turning. Coming up with the
right tooling to make this possible is a creative art. I find old metalworking
books and magazines have a lot of ideas, and I have collected a small
page of techniques as well.
Surface Plate and Height Gage Used to Create An
Offset Fixture...
Using a cutoff tool for clearance to turn the crank
offset...
Truing
a Lathe Chuck
You can increase the accuracy
of a lathe chuck by truing the jaws. Doing so involves grinding them with
the chuck spinning. You will also want the jaws to be loaded, so place
a washer or other piece deep inside the chuck and clamp down on it. Then,
use a toolpost grinder (rig one up if you have to) and a small stone to
grind the inside of the jaws until you get down to the washer. You are
only looking to take off a tiny bit of material, which makes the lathe
jaws concentric.
It is also suggested that
for maximum accuracy, you always tighten with one of the multiple tightening
holes in a 3-jaw chuck. Check which one works best, mark it, and stick
to it.
The other way to true up a lathe chuck is to use an Adjust-Tru or Set-Tru Chuck. These chucks have set screws in the backplate that allow the chuck's orientation to the spindle centerline to be precisely adjusted.
Do you want to be a better CNC'er in 37 Seconds?
Get Better Tool Life, Surface Finish, and Material Removal Rates Fast.
It's that easy. You can install and get results in a matter of minutes.