|
|
|
|
|
|
|
Do you want to be a better CNC'er in 37 Seconds? Get Better Tool Life, Surface Finish, and Material Removal Rates Fast. It's that easy. You can install and get results now. |
 |
Conversational CNC |
Introduction
Before there was CNC, we had Manual Machining (actually, we had hydraulic tracers and other limited automation, but bear with me) and a lot of very good parts got made fairly quickly. Even today the subject of whether CNC'ers need to learn Manual Machining will often provoke a strong debate back and forth. Many believe that CNC is only good for making many parts or complex parts. They maintain that manual machining will be faster any time you're just making one relatively simple part.
If you drill down on the argument and ask why manual machining would be faster, the two most common answers I get are:
#1 Because our CNC isn't tooled like a manual machine, it's tooled to make lots of identical parts quickly.
This, of course, is a matter of choice and I don't see it as a particularly good argument in favor of the manual machines. There are plenty of excellent toolroom CNC machines such as the Haas TL series lathes. You don't have to tool your CNC in that way.
#2 Because you have to stop and make a CAD drawing and then do CAM work to get the g-code for the CNC. With Manual Machining, you can often work directly from the print.
This one is much closer to the mark. It can be a lot of trouble to produce a CAD drawing and run a CAM program for some simple part, particularly on lathes where simple spacers and bushings are so easy to run off quickly on a good manual lathe.
We've seen in our last chapter that with MDI, you can treat your CNC like a Manual Machine. For many, that's the end of the argument--with the same tooling a CNC is just as fast or maybe even faster than the Manual Machine. But, we can go even a step further and be substantially ahead of the Manual Machine if we have Conversational CNC.
What is Conversational CNC?
Conversational CNC is a quick way to do simple jobs without resorting to creating a CAD drawing or running a CAM program. For all those times when you would turn to a manual machine instead of a CNC because the overhead of the CADCAM cycle was going to mean you could do it faster manually, this is a better way. Now you can stick with the CNC and do the job even faster than the manual, even for one-off parts. The key is simplicity. Lathes are particularly well suited to Conversational CNC, because many round parts are fairly simple. But there are many applications for Conversational CNC on Milling Machines too.
Think of Conversational CNC whenever you have a relatively simple part that doesn't have a lot of features or features that involve complex curves and shapes. Brackets, bushings, spacers, and the like are common examples. Another great application for Conversational CNC is secondary operations. Rather than go all the way back through the CADCAM cycle to pick up a hole that was missed or to move some holes, try using Conversational CNC. It's quick and easy.
If you want to see some examples of how to program certain features in g-code, Conversational CNC is a quick way to turn them out.
Let's run through some Conversational CNC examples for both Turning or Milling.
Conversational CNC for Milling
First, here is the graphical menu showing the various Conversational CNC operations available in G-Wizard Editor:
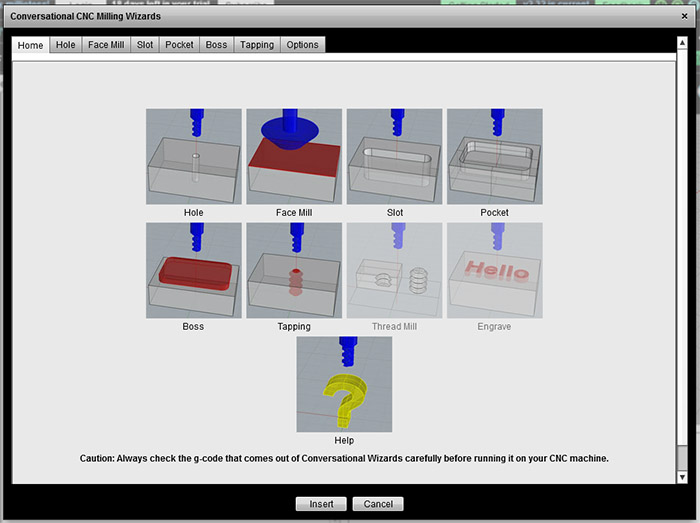
Conversational CNC Operations in G-Wizard Editor...
What you have to do is break your part down into these basic operations:
- Hole: Drill or Interpolate a hole.
- Face Mill: Surface the top of the workpiece
- Slot: Cut a slot at any angle.
- Pocket: Cut a rectangular or round pocket.
- Boss: Cut a rectangular or round boss.
- Tap: Tap a hole
- Thread Mill: Thread Mill internal or external threads
- Engrave: Do simple engraving
As you can see, quite a lot is possible with these basic options. If you click one, you'll get a popup Wizard like this one for the Hole Operation:

The Conversational CNC Hole Wizard
Now it's just a matter of filling in the blanks. You've got some basics at the top:
- Work Offset: Let's you use work offsets, you won't need them at first, so just leave it set to 54.
- Safe Z: This is the Z where the cutter can move freely without hitting anything. If 0 is the top of the workpiece, I usually make Safe Z 1" above.
- Rapid to Z: This is the height where we can rapid down to there, but XY motions must be at feed speeds. I make this 0.2" above the Material Top.
- Material Top Z: Cutting begins here and most CNC'ers like to make that value 0.
- Roughing/Finishing Tools and Coolant. You need to tell the Wizard which tools to use and whether to turn on Coolant.
Next is a set of options for positioning multiple holes:
- Put the hole at the Current Position
- Give a list of hole coordinates
- Make a circle of holes
- Place the holes on an arc
- Place the holes in a grid
- Place the holes in a line
Lastly, we get into the details of how the hole will be programmed:
- Via canned cycle
- Custom cycle: A powerful deep hole drilling capability is provided here
- Interpolated: Where an endmill is used to make holes potentially much larger than the diameter of the endmill. This is a powerful technique not available on Manual Machines!
Having answered the questions, you click the "Insert" button and finished g-code is placed in the file you're editing. It will be fully documented with comments and ready to run.
Conversational CNC for Turning
Conversational CNC for a Lathe is very similar. Here is the graphical menu of lathe operations:
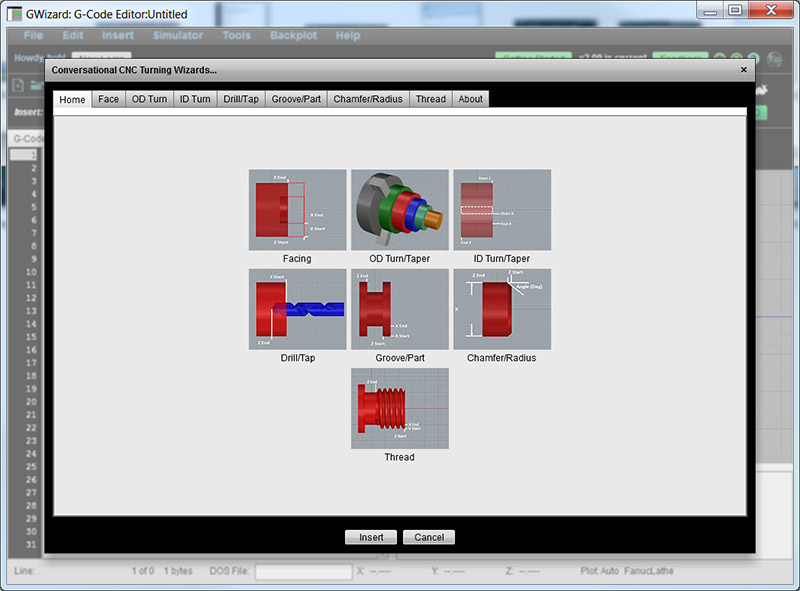
Conversational Operations for Lathe
The lathe has its own basic operations:
- Facing
- OD Turning and Tapers
- ID Turning and Tapers
- Drilling
- Tapping
- Grooving
- Parting
- Chamfer
- Radius
- Threading: ID and OD
It's so much easier to perform many of these operations using Conversational CNC than to try to use a Manual Lathe. You'd never get the taper attachment set up or threading dialed in before the CNC was done. For some of these things you'd need special tooling such as a ball turning fixture.
Using the Wizards is much like with the Mill Wizards. Here is the OD Turning Wizard for example:
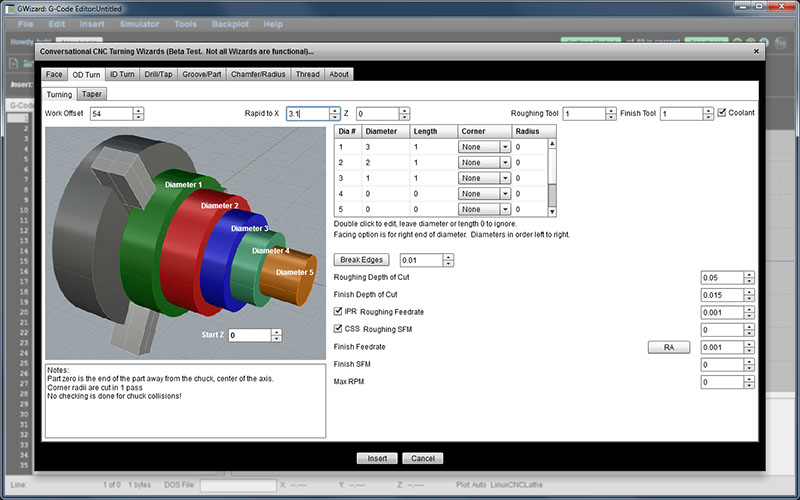
The OD Turning Wizard...
The OD Turning Wizard enables you to specify multiple diameters, the length of each section of that diameter, and a treatment of the corner so that it can be left alone, chamfered, or radiused. You can fill all this in directly while looking at a print and save a lot of CADCAM time!
Here is a quick video tutorial on using the OD Turning Wizard:
A quick walkthrough of how to use the Lathe OD Turning Conversational CNC Wizard.
Where Can I Find Conversational CNC?
Conversational CNC is available from a lot of sources. It is an option for many machine tools, though it can seem expensive at the time until you think about the cost savings of not having to run through CADCAM. Here is a great video showing how to use the Conversational CNC capabilities of the Tormach Lathe:
Exercises
1. Give Conversational CNC a try. Fire up G-Wizard Editor's Conversational CNC Wizards and see if you can create g-code for some simple part. You may find the videos in our G-Wizard University helpful to getting started.
Try the Free Trial Version of G-Wizard G-Code Editor...
![]()
No credit card required--just your name and email.
Next Article: One Shot and Modal G-Codes
|
Do you want to be a better CNC'er in 37 Seconds? Get Better Tool Life, Surface Finish, and Material Removal Rates Fast. It's that easy. You can install and get results now.
|
||||||||||||||||||
| ||||||||||||||||||